About this Manual:
This is a general user manual for the HolestPay system that explains functionalities applicable to all platforms. This document does not mention specific features of individual e-commerce platforms (WooCommerce, Custom, Shopify, Magento, OpenCart, Drupal, WiX, Etsy, Kajabi etc...) but focuses on:
- Core concepts and functionalities of the HolestPay system
- Common operations available on all platforms
- Management through the central HolestPay panel
- API and integrations that are universal
For specific instructions related to your platform (module installation, configuration, platform-specific features), please consult the additional documentation for that platform.
1. Introduction to HolestPay
HolestPay is an advanced system that enables integrated management of payments, shipping, fiscalization, and business processes through a single central platform. The system is provided by Holest e-Commerce doo, a PSP (Payment Service Provider).
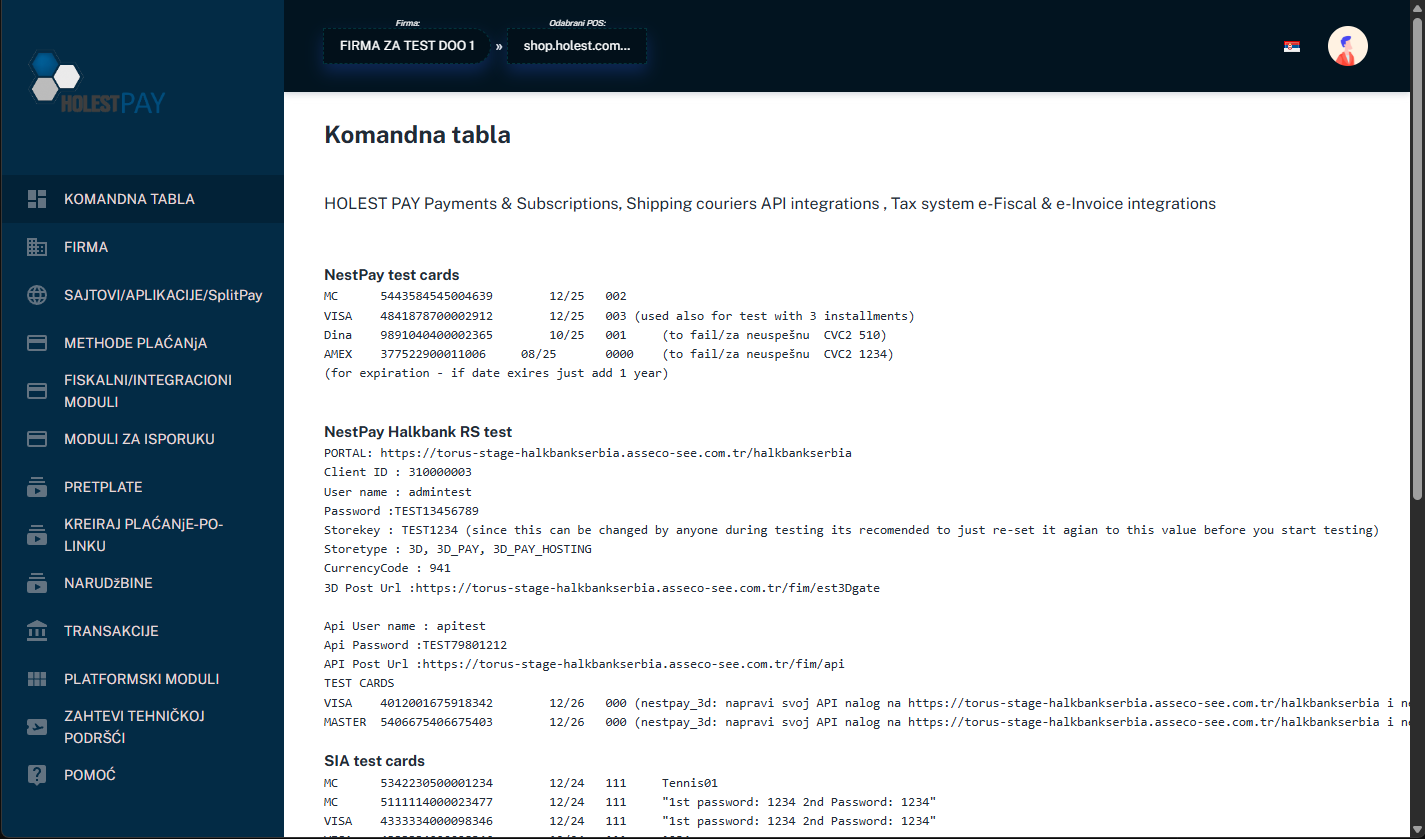
Figure 1: HolestPay Dashboard
Key System Features:
- Multi-channel Payments - Support for card payments, IPS mobile payments, payment slips, installments, and other methods
- Fiscalization - Automatic integration with e-Fiscal system (Republic of Serbia)
- Shipping Management - Support for multiple courier services and package management
- PCI DSS Compliance - Panel developed in accordance with PCI DSS ver 4.0.1 security standards
- Mandatory MFA - Multi-Factor Authentication (PIN, SMS, EMAIL, BIOMETRIC)
- Flexible Integration - Can be integrated with various e-commerce platforms, mobile applications (Android/iOS), and POS systems
- Reporting - Detailed display of transactions, fiscalization, and shipping in real-time
Important - What is POS in HolestPay Terminology:
In the HolestPay system, the term "POS" refers to a website (web shop), Android application, or iOS application - NOT a physical POS terminal used in stores. Each POS represents a single sales point, whether it's a website, mobile application, or desktop application.
Important: HolestPay is available in two environments:
- Sandbox (https://sandbox.pay.holest.com/) - For testing, completely free and fully unlocked
- Production (https://pay.holest.com/) - For production use, requires subscription
These environments are intentionally isolated. You need to create and configure all parameters separately for each environment.
2. Basic Concepts and Terminology
Before you start using the HolestPay system, it's important to understand the basic concepts and terminology used in the platform. This section explains the key operations and statuses that form the foundation of working with the system.
2.1. Payment Operations
HolestPay supports various types of payment operations, depending on the business model and needs:
Authorization
Standard payment model where money is immediately transferred from the customer's card to the merchant's account.
Flow:
- Customer enters card details
- System sends authorization request to the bank
- Bank approves or declines the transaction
- If approved, money is transferred to merchant's account (clearing 1-3 days)
Pre-Authorization
First step in a two-step payment model that enables fund reservation.
Characteristics:
- Money is reserved (blocked) on customer's card
- No money transfer occurs
- Customer cannot use reserved funds
- Reservation has a validity period (usually 7 days)
When to use:
- When goods are not immediately available (reservation)
- When final price may change (e.g., by weight, additional services)
- For services where the exact amount is determined later
- Hotels, car rentals, deposits, etc.
Post-Authorization / Capture
Second step in the two-step model - executing the actual money transfer after reservation.
Characteristics:
- Actual money transfer is executed from reserved funds
- Can be for full amount or less (partial charging)
- Must be executed before reservation expires
- Some gateways support multiple consecutive captures as long as sum ≤ reserved amount
VOID (Cancellation)
Operation that cancels a transaction before the bank executes clearance.
Usage:
- Canceling pre-authorization - releases reserved funds on customer's card
- Canceling authorization - only possible within a few hours after transaction
Advantages:
- Usually no commission (unlike refund)
- Faster fund release for customer
- Cleaner transaction history
Note: After the bank executes clearance (usually 2-24 hours), VOID is no longer possible. Then you need to use REFUND. IPS method does NOT support VOID operation.
REFUND (Money Return)
Operation that returns money to the customer after the transaction is already executed and clearing is completed.
Characteristics:
- Can be full or partial refund
- Usually has a commission
- Money is returned to the same card/payment method used for payment
- Process can take 3-10 days
- Some methods don't support partial refund
Status Query
Operation to check transaction status directly with the payment gateway.
When to use:
- If you suspect status is not synchronized
- After technical communication problems
- If customer claims payment was made but system doesn't show payment
- For verification of unclear states
HolestPay uses a complex status format that combines statuses from all modules (payment, fiscalization, shipping). This is the most authoritative status to use in your work.
HolestPay Status Format:
[PAYMENT:payment_status][ (fmethod1_uid)_FISCAL:(fmethod1_status) [(fmethod2_uid)_INTEGR:(fmethod2_status)]...][ (smethod1_uid)_SHIPPING:packet_no@shipping_status [(smethod2_uid)_SHIPPING:packet_no@shipping_status]...]
Important Rules:
- SECTION ORDER IS IMPORTANT: PAYMENT → FISCAL & INTEGRATION → SHIPPING
- Order of methods within the same section is NOT important
- ONE SINGLE SPACE CHARACTER as separator between sections
- PAYMENT section may not exist if you don't use HolestPay payment modules or if you don't set it explicitly
- FISCAL & INTEGRATION sections: Modules can add status as
<module-uid>_FISCAL:<status> or <module-uid>_INTEGR:<status>. Important: Some modules don't add any status to HolestPay format
- SHIPPING sections exist only if there are packages managed by HPay shipping modules
Possible Payment Statuses:
| Status |
Description |
| SUCCESS / PAID |
Fully paid |
| RESERVED |
Amount reserved (pre-authorization), not yet captured |
| AWAITING |
Awaiting payment (e.g., bank payment slip) |
| PAYING |
Partially paid, used for advance or multi-source payments |
| REFUNDED |
Fully refunded |
| PARTIALLY-REFUNDED |
Partially refunded |
| VOID |
Voided |
| OVERDUE |
Payment deadline expired |
| EXPIRED |
Deadline expired (for methods with expiry) |
| OBLIGATED |
Same as AWAITING but when service delivery has started or there's legal guarantee |
| REFUSED |
Refused |
| FAILED |
Failed |
| CANCELED |
Canceled |
HolestPay Status Examples:
PAYMENT:PAID efiscalrs_FISCAL:sale dexpressrs_SHIPPING:AG0304309722@DELIVERED
Explanation: Payment completed, fiscal module added "sale" status, package delivered
PAYMENT:RESERVED
Explanation: Pre-authorization, awaiting capture
PAYMENT:PAID efiscalrs_FISCAL:sale some_uploader_INTEGR:uploaded dexpressrs_SHIPPING:AG001@PREPARING
Explanation: Paid, fiscal module (_FISCAL) added "sale" status, integration module (_INTEGR) added "uploaded" status, package preparing
PAYMENT:PAID dexpressrs_SHIPPING:AG0304309722@DELIVERED
Explanation: Paid and delivered. Fiscal module is configured but doesn't add status to HolestPay format
some_uploader_INTEGR:97
Explanation: Only integration module with status 97, without payment and shipping modules
Important: This is a uniform status format used throughout the platform - in the panel, API responses, webhook notifications, and platform modules. Understanding this format is crucial for proper implementation and order management.
3. Prerequisites and Initial Setup
3.1. Creating a User Account
Before using the HolestPay system, you need to create a user account in the appropriate environment:
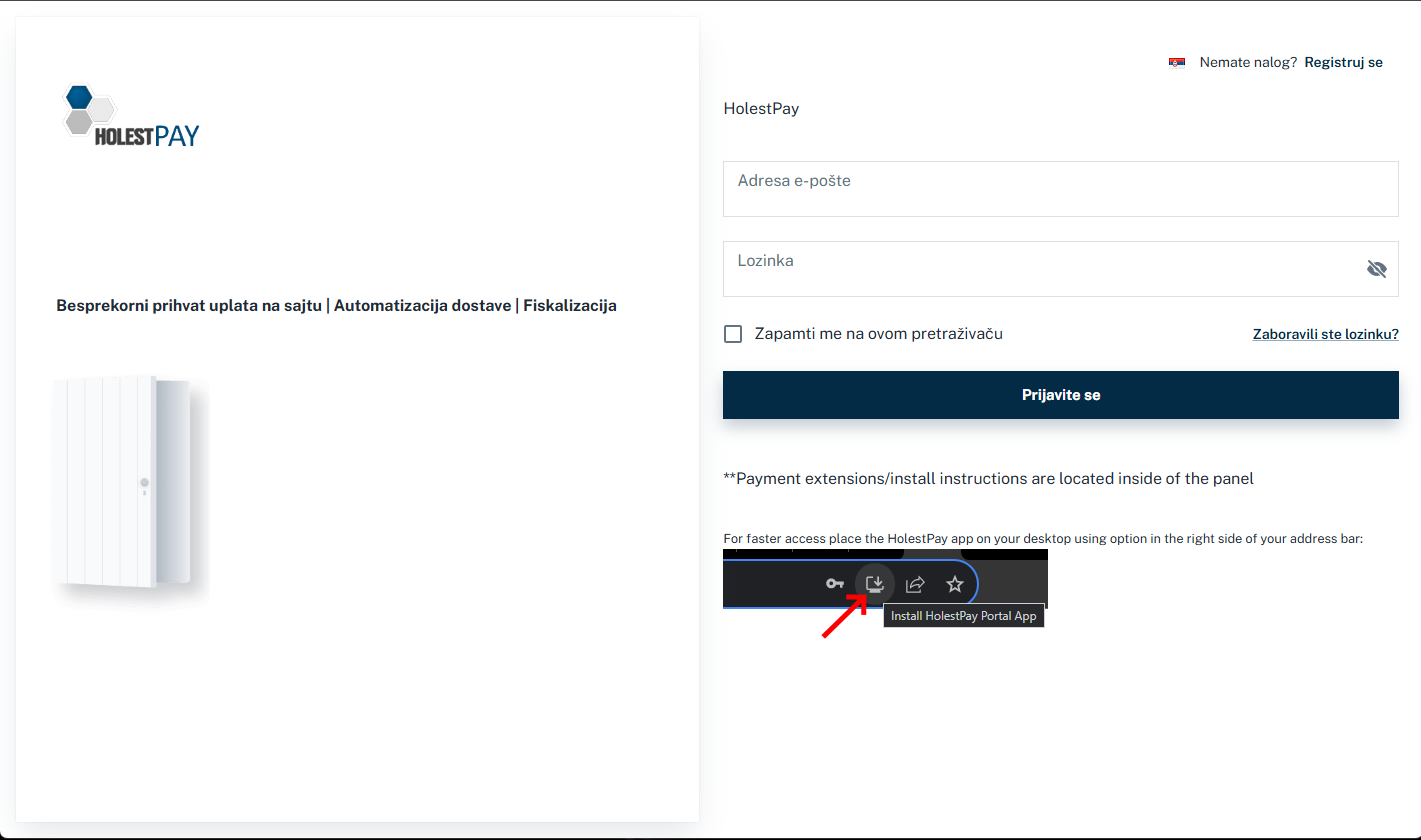
Figure 2: HolestPay system login screen
- Visit the website: https://sandbox.pay.holest.com/ (for testing) or https://pay.holest.com/ (for production)
- Click on "Register" option
- Fill in the data:
- First and last name
- Email address (used for login)
- Password (must meet security requirements)
- Password confirmation
- Check the option to set up biometric/WebAuthn identity protection (recommended)
- Click "Register"
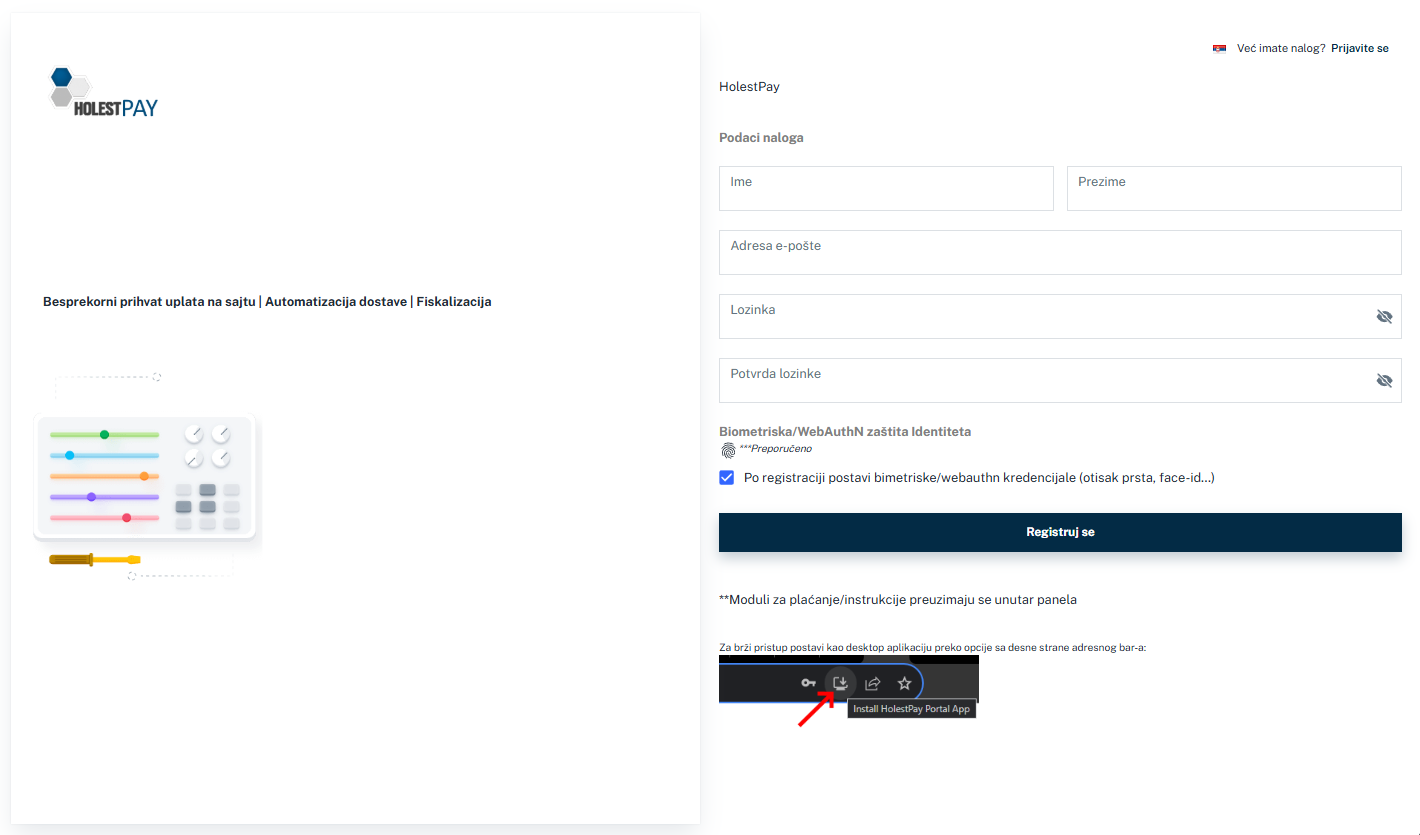
Figure 3: New user registration form
3.2. Multi-Factor Authentication (MFA)
HolestPay requires Multi-Factor Authentication for all users. This is a mandatory security measure that protects your account.
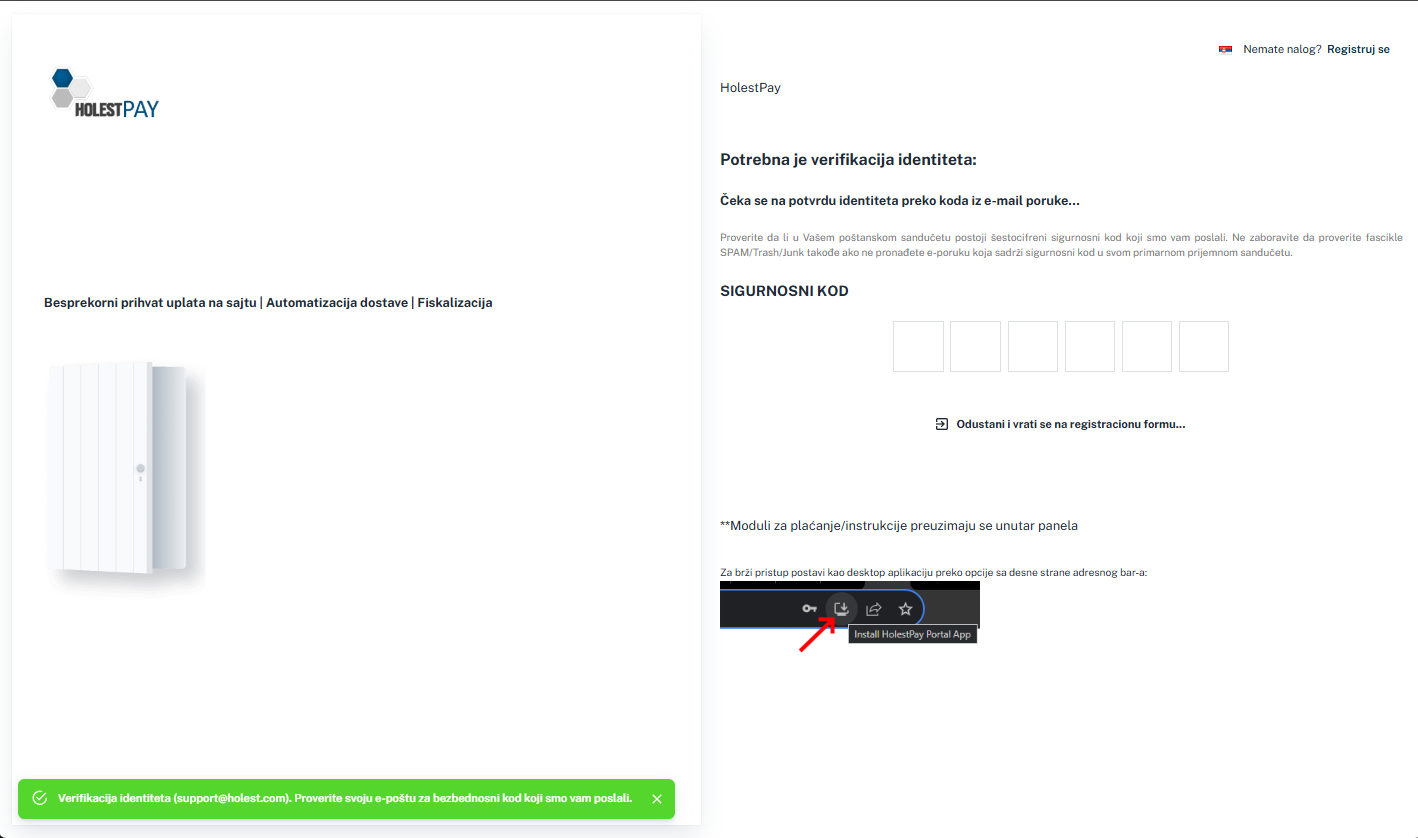
Figure 4: Security code entry screen (MFA)
Supported MFA Methods:
- PIN - Personal identification number
- SMS - Code sent via SMS message (provided you've entered phone in profile)
- EMAIL - Code sent to email address
- BIOMETRIC - Fingerprint or face recognition (WebAuthn)
MFA Verification Process:
- Enter email and password
- System will send security code to email or phone
- Enter received code in "SECURITY CODE" field
- System will log you in after successful verification
Note: We recommend using biometric authentication (fingerprint, face-id) as it's the fastest and most secure option.
3.3. Creating a Company
Important - How Company Creation Works:
- First user (founder or IT specialist implementing the system on the site) - creates the company and automatically becomes the owner (Owner) of that company
- Other users (employees/collaborators) - must first independently create their own account on the HolestPay platform
- Adding access - After other users create their accounts, the first user (Owner role) grants them access to the company they created
Company creation process (for the first user - founder):
- Log in to HolestPay panel
- In the left menu, select "COMPANY" option
- Click "Create a company" button
- Enter company data:
- Company name
- Tax ID number
- Registration number
- Address
- Contact phone
- Company logo (optional)
- Save the data
- You automatically get the "Owner" role for this company
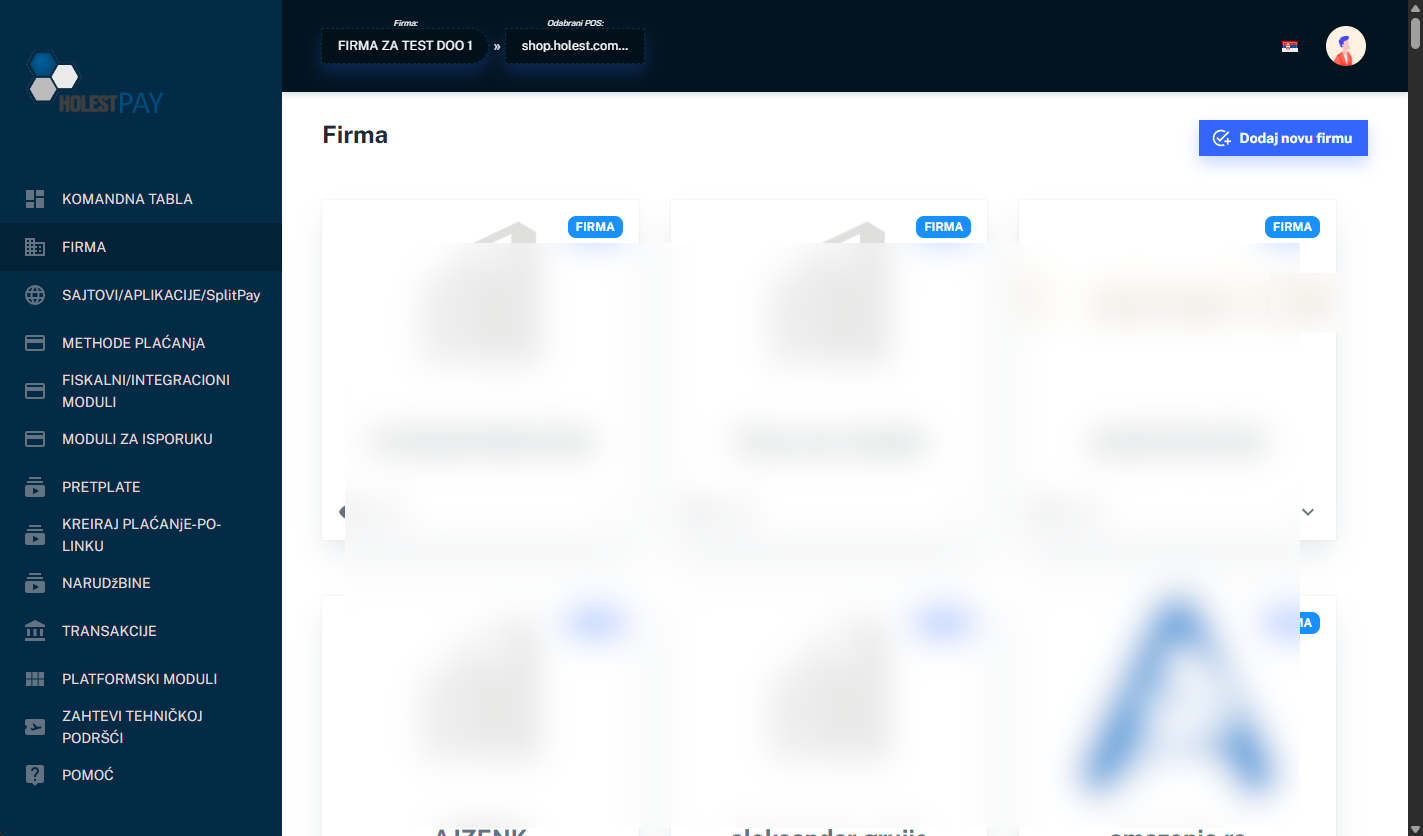
Figure 5: List of companies the user manages
For other users: If you're not the company founder, first create your account (Chapter 3.1), then ask the company Owner to grant you access (Chapter 3.4 - User Management).
3.4. User Management
If multiple people need access to the HolestPay panel, you can assign them appropriate roles:
User Roles:
- Owner - Full control over the company and ability to transfer ownership. Created automatically for the user who created the company. Only one account can have Owner role for a company.
- Administrator - Access to all features except owner management. Can become Owner if current Owner transfers ownership to them.
- Operator (Staff) - Limited access to operational functions only
Adding a New User:
- New user must first create their account on HolestPay platform
- In Company settings, go to "Users" section
- Click "Add user"
- Enter user's email address
- Assign appropriate role (Administrator or Operator)
- Save
Important - Role Rules:
- Owner role: Only one account can be Owner of a company at any given time
- Company creation: Person who creates the company automatically gets "Owner" role
- Ownership transfer: Owner can transfer ownership to another user, but only if that user was previously added as Administrator
- Flexibility: One user can have access to multiple companies and can create multiple companies
3.5. Creating a POS (Site or Application)
Each company can have multiple POSes (websites, Android/iOS applications):
- In the left menu, select "SITES/APPLICATIONS/SplitPay"
- Click "Add new POS"
- Select POS type:
- Website / E-commerce
- Android App
- iOS App
- Desktop application
- Enter data:
- POS name
- URL or application identifier
- Description (optional)
- Save
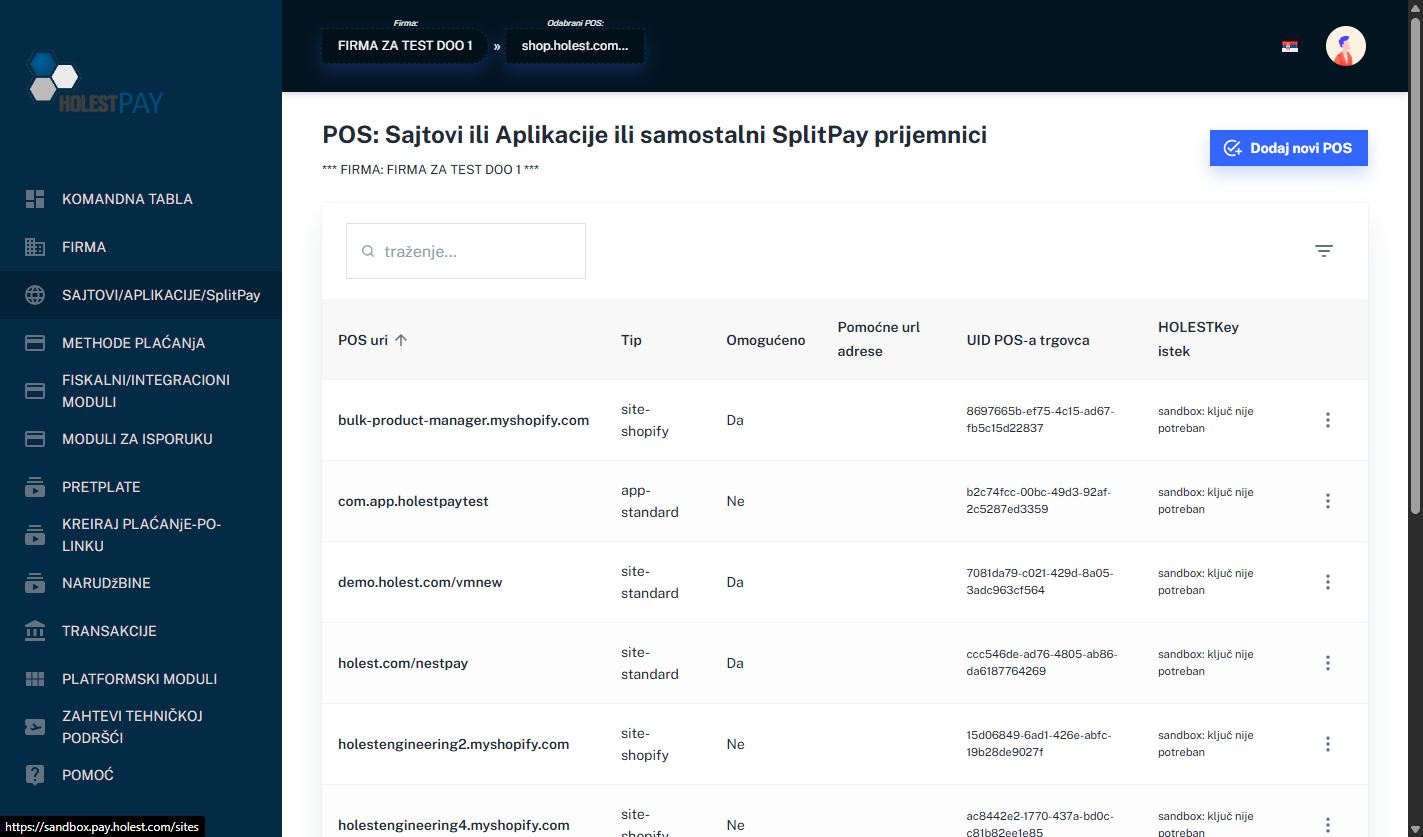
Figure 6: List of POSes (Sites/Applications) for company
Merchant POS UID and Merchant POS Secret: After creating a POS, the system will generate two key pieces of data:
- Merchant POS UID - Unique identifier of your POS
- Merchant POS Secret - Secret key for authentication
You will use this data to connect your site or application to the HolestPay system. Keep them in a safe place!
HolestPay Subscriptions:
- Subscription is paid per one POS
- Each POS can have its own payment, shipping, and fiscalization methods
- It's not mandatory to use all modules - you only add what you need
- Specialized subscriptions are available: fiscalization only, shipping only, etc.
- Availability of certain features depends on subscription type
4. Payment Methods
HolestPay supports various payment methods that can be configured according to your business needs. Availability of certain methods depends on the type of subscription you have.
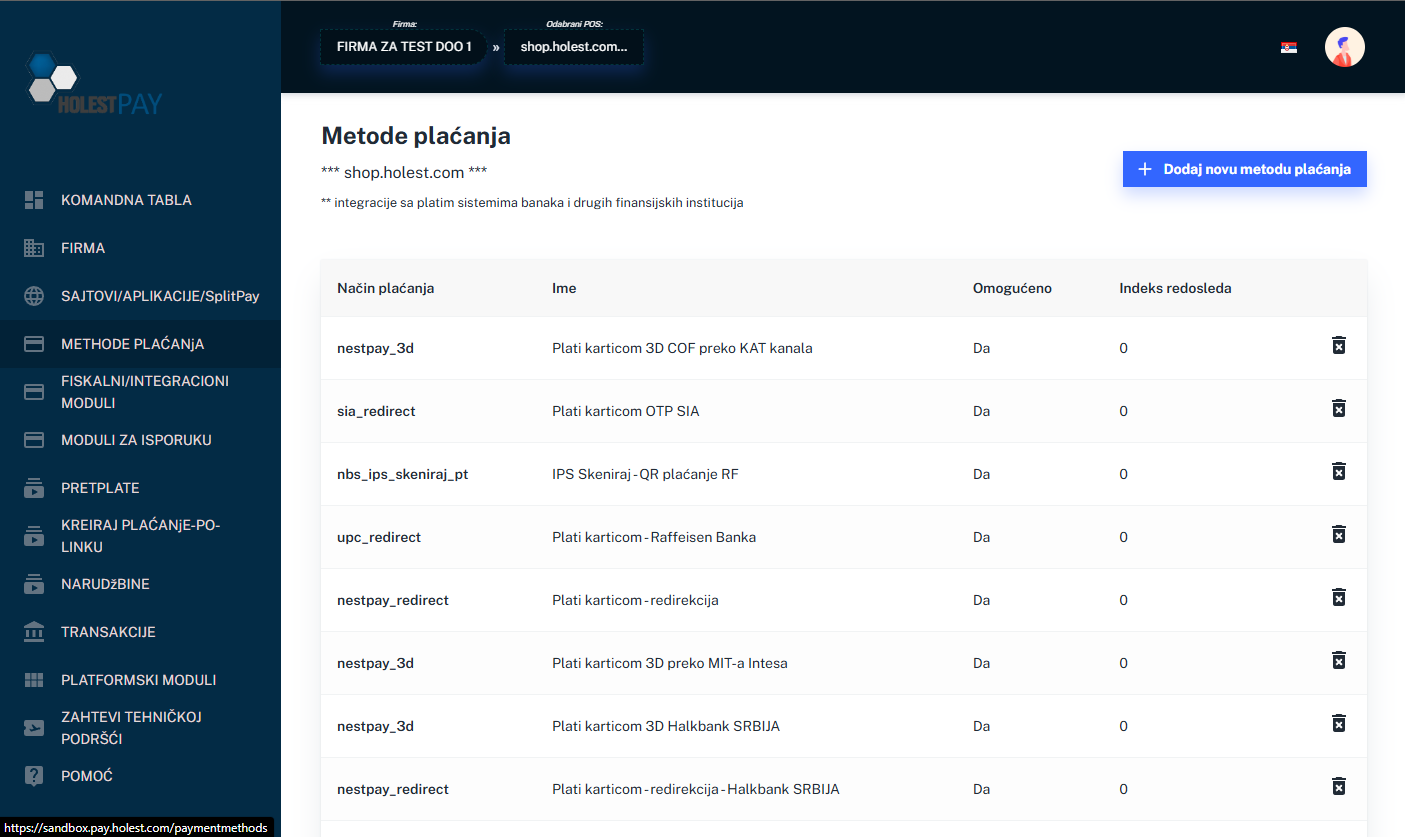
Figure 7: Example of payment methods list for POS
Note: You don't need to specify card brands (Visa, Mastercard, etc.) in advance - this depends on dynamic options and payment methods you add. Each method has its own supported cards.
4.1. Payment Method Types
Card Payments
Characteristics:
- 3D Secure authentication for increased security
- Support for pre-authorization and delayed charging
- Ability to pay in installments through bank
- PCI DSS ver 4.0.1 compliance
- Different payment gateways support different options (e.g., some don't support partial refunds)
Note: HolestPay supports a large number of payment gateways for card payments. Each gateway module you add brings its own specific options and operations (VOID, Capture, Refund, Status Query, etc.). Availability of certain operations depends on the module you use.
IPS Mobile Payments
Instant Payment System - Payment via:
- QR code scanning
- Entering phone number connected to bank account
Advantages:
- Instant transactions
- No costs for customer
- Lower commissions for merchant
Important: IPS payments do NOT support VOID operation. For money return, you can only use REFUND.
Payment Slip with NBS QR Code
Automatic generation of payment slip containing:
- NBS QR code for mobile payment
- All necessary data for bank payment
- Unique payment identification
Characteristics:
- Ability to import morning bank statement for automatic payment matching
- Convenient for customers without payment cards
Installment Payments
Enables customers to pay in monthly installments through the bank:
- Different number of installments (e.g., 3, 6, 12, 24 months)
- Interest rates defined by bank
- Instant customer eligibility check
Warning: Installment payments cannot be refunded programmatically. In case of need for refund, you must contact the bank directly. This is due to interest rates and specific installment payment structure.
5. Shipping Methods
HolestPay enables integration with various courier services and complete shipping process management.
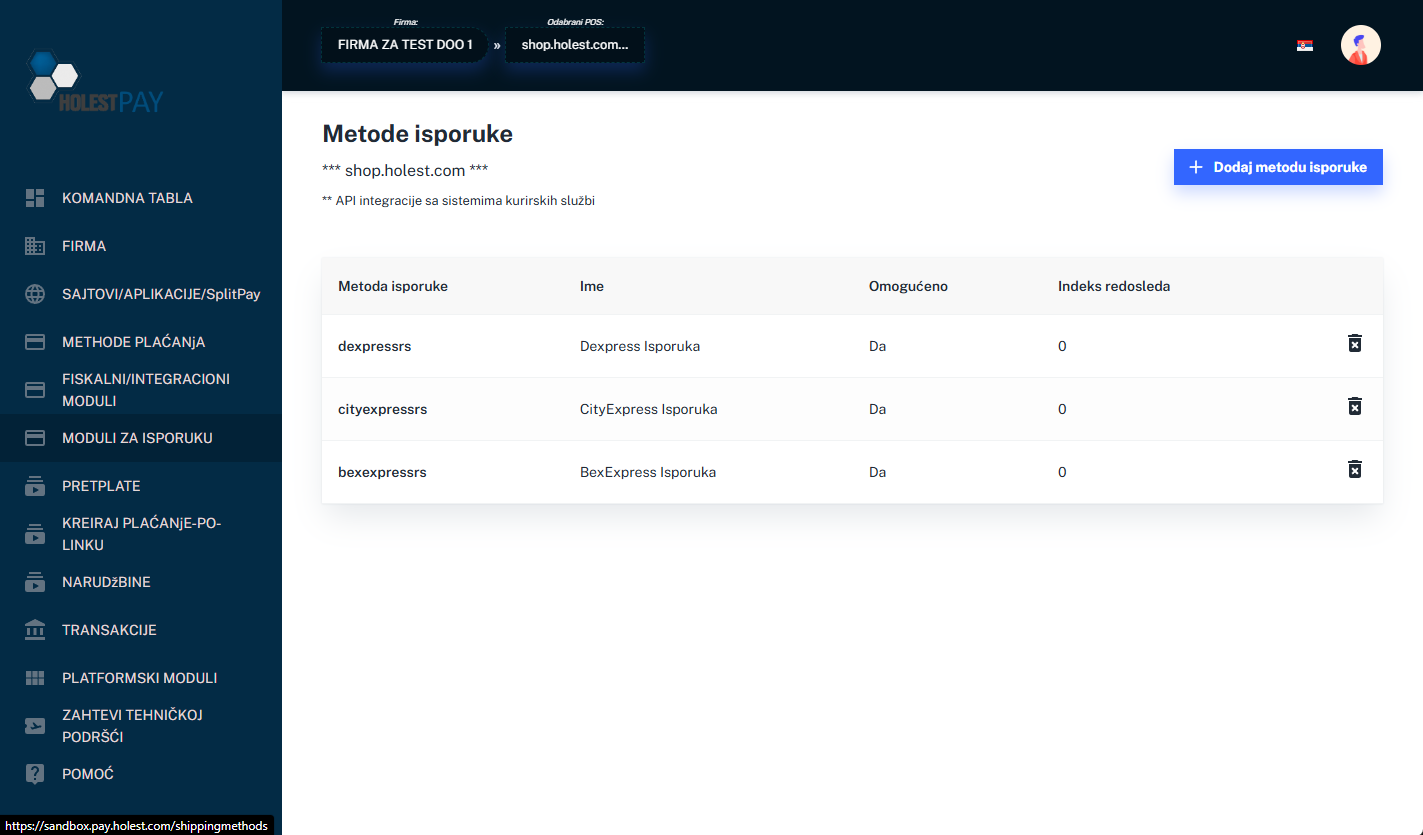
Figure 8: Example of shipping methods list
Shipping Module Features:
- Automatic shipment creation
- Package label generation
- Shipping status tracking
- Multi-warehouse/storage management
- Support for multiple packages per order
- Automatic customer notifications
Note: HolestPay supports integration with various courier services. Each shipping module you add brings its own specific options and operations. Basic options include creating courier instructions and printing tickets, while additional features depend on the module and courier API you use.
Editing Shipping Data
When creating or editing a shipment, you can customize all data sent to the courier:
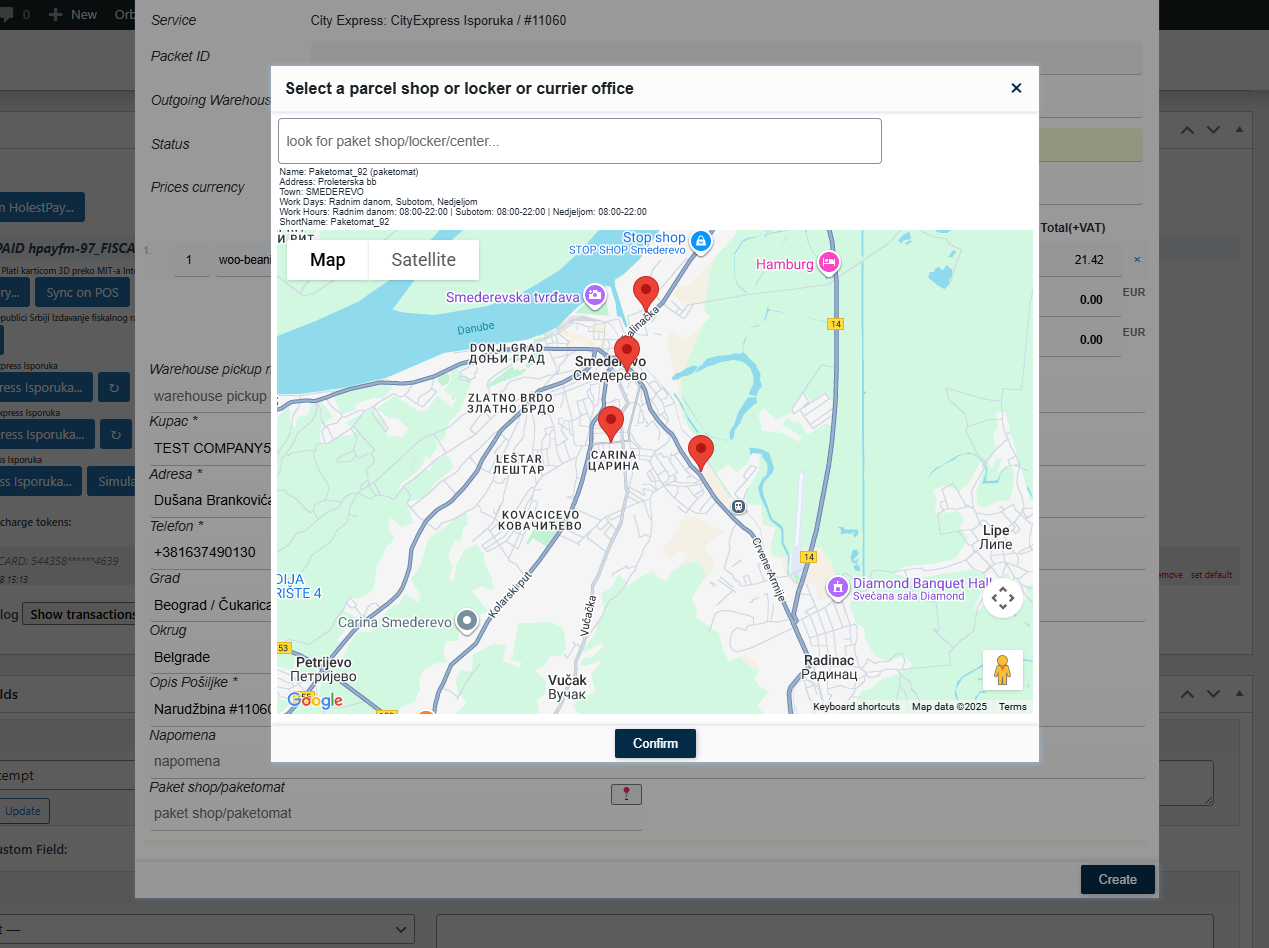
Figure 8a: Form for editing data sent to courier service - enables complete control over shipment information
The form enables editing:
- Recipient data: First name, last name, contact phone, email
- Delivery address: Street, number, floor, city, postal code, country
- Shipment details: Weight, dimensions, content description
- Service type: Standard delivery, express, cash on delivery, etc.
- Special instructions: Notes for courier or recipient
- Shipment value: For insurance and customs declaration purposes
Important: All data can be modified before the shipment is finalized and sent to the courier service. After the courier picks up the package, changes can only be made through the courier service directly.
5.1. Shipping Statuses
Each package has a label in format:
<courier-tracking-code>@STATUS [(warehouse name - if not default)]
Example:
AG0304309722@PREPARING
AG0304309723@READY (Warehouse Gornji Milanovac)
Status List:
| Status |
Description |
| PREPARING |
Initial status when delivery address is valid. Goods are being prepared for shipping. |
| READY |
Goods are prepared and checked, ready for courier pickup. |
| SUBMITTED |
Request sent to courier service, awaiting pickup. |
| DELIVERY |
Shipment is with courier, delivery in progress. |
| DELIVERED |
Shipment successfully delivered to customer. |
| ERROR |
Error in communication with courier service API. |
| RESOLVING |
Delivery address or something else requires attention (manual intervention). |
| FAILED |
Delivery permanently failed (customer unavailable after multiple attempts) or courier API rejected request. |
| REVOKED |
Delivery canceled by customer or company. |
Note: Status REVOKED is used instead of CANCELED. This is aligned with the latest system version.
6. Fiscalization and Integrations
HolestPay provides advanced fiscalization and business system integration capabilities.
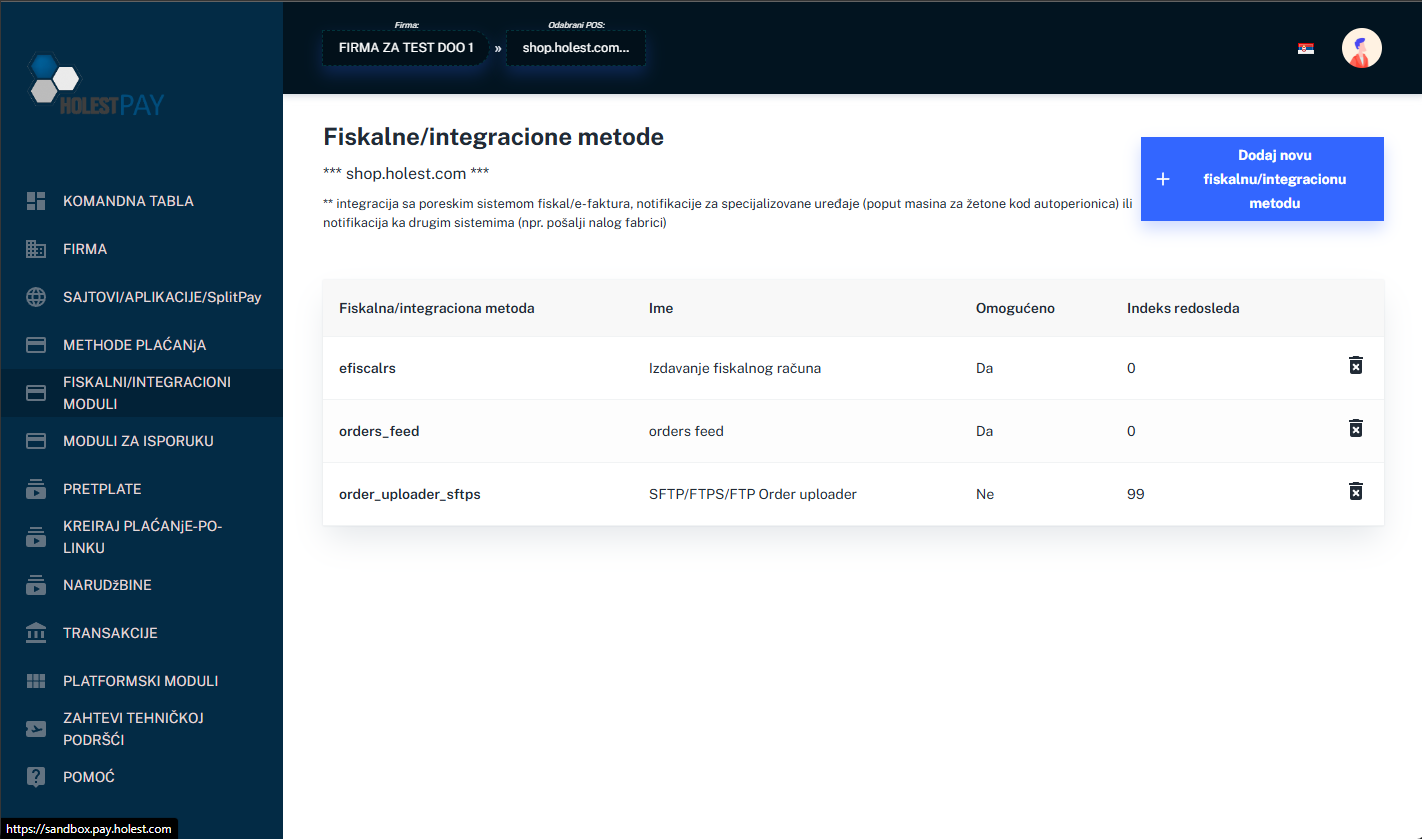
Figure 9: Example of fiscal and integration methods list
6.1. E-Fiscal RS (Electronic Fiscalization - Serbia)
Automatic integration with the Tax Administration system of the Republic of Serbia for issuing electronic fiscal receipts.

Figure 10: Example of electronic fiscal receipt with QR code
Capabilities:
- Automatic or manual fiscal receipt issuance
- Sending fiscal receipts to customers via email
- Storing all fiscal documents
- QR code for verification on each receipt
- Compliance with Fiscal Cash Register Law
- Adds status to HolestPay format as
efiscalrs_FISCAL:<status>
Legal Framework: According to law, fiscal receipt must be issued no later than 24 hours after the sale. With HolestPay system, it's possible to issue receipt at the moment of goods delivery to customers, which is the ideal solution.
When goods are shipped via courier service, three options are possible by law:
Option 1: Digital fiscal receipt before delivery
- Fiscal sale receipt is created digitally and sent to customer before delivery (e.g., email, SMS)
- Customer receives receipt immediately after shipment creation
- Fastest option, but receipt is issued before it's certain customer will receive the package
Option 2: Printed fiscal receipt with package
- Fiscal sale receipt is printed and sent together with goods in the package
- Customer receives physical receipt when picking up the package
- Traditional approach, receipt travels with goods
Option 3: Fiscal proforma + delayed fiscal sale (recommended)
- A fiscal proforma (advance invoice) is sent with the package
- Fiscal sale is created only when courier API reports that customer received the package
- Can be done automatically (when HolestPay receives DELIVERED status from courier) or manually
- Advantage: Avoids creating fiscal sale if customer doesn't receive package for any reason (refuses delivery, package returns, etc.)
- This is the most flexible option and reduces the need for fiscal cancellations
HolestPay supports all three options - choose the one that best fits your business process.
6.2. Fiscal Document Types
Fiscal Sale Receipt
When issued:
- After payment is completed
- When goods are handed over to customer (optimal)
- Within 24h from sale moment (legal minimum)
Contains:
- Goods/services details
- Prices with and without VAT
- Seller information
- Date and time
- Unique ESIR number
- QR code for verification
Fiscal Refund Receipt
When issued:
- When customer returns goods and requests refund
- Must reference original sale receipt
Required:
- Customer identification (TIN - Tax Identification Number)
- Tax ID, personal ID, or other valid identification number
Important: Without valid customer TIN, fiscal refund cannot be issued. In that case, "Recall" is used instead of refund.
Receipt Recall (Fiscal Recall)
When used:
- When error was made in receipt issuance
- When customer requests refund but refuses to provide personal data (common case)
- Cancels original receipt
Characteristics:
- Doesn't require customer TIN identification
- Constitutional right to privacy is stronger than fiscal law, so it's allowed instead of refund
- Practically most commonly used for money refunds
Advance Payment Receipt (Fiscal Advance)
When used:
- Customer pays part of price in advance (e.g., 30% reservation)
- For ordering goods or starting production
- To avoid higher taxes before receiving full amount
Process:
- Advance receipt is issued for received amount
- Additional advance receipts can be issued (each references previous one)
- Final sale receipt references all advances
Required: Customer TIN identification
Proforma Invoice (Fiscal Proforma)
When used:
- For giving quote to customer
- For clearer transaction records
- Optional - doesn't directly affect taxes
Process:
- Proforma is issued
- Customer later pays
- Final sale receipt is issued referencing proforma (Tax Invoice Id)
Required: Customer TIN identification
6.3. TIN and Tax Identification
For fiscal refunds, advances, and proformas, customer identification via TIN (Tax Identification Number) is mandatory.
TIN Format:
PREFIX:VALUE
Supported Prefixes:
| Prefix |
Description |
Example |
| 10 |
Customer Tax ID / RS VAT NO (legal entity) |
10:105677555 |
| 11 |
Personal ID (individuals - RS citizens) |
11:1008985730021 |
| 12 |
Tax ID and JBKJS (sales to government institutions) |
12:... |
| 20 |
ID card number (RS ID) |
20:... |
| 21 |
Refugee card number |
21:... |
| 22 |
EBS |
22:... |
| 23 |
Passport number (Serbian passport) |
23:... |
| 30 |
Passport number (foreign passport) |
30:... |
| 31 |
Diplomatic card |
31:... |
| 32 |
ID card (North Macedonia) |
32:... |
| 33 |
ID card (Montenegro) |
33:... |
| 34 |
ID card (Albania) |
34:... |
| 35 |
ID card (Bosnia and Herzegovina) |
35:... |
| 40 |
Tax ID from foreign country (Foreign TIN) |
40:61-2344005 |
6.4. Other Fiscal & Integration Integrations
Important - How Fiscal & Integration Modules Work:
- Each fiscal & integration module adds its own specific operations to the system
- Operations differ from module to module
- Each module adds its own commands for orders, transactions, and subscriptions
- Modules are activated automatically or manually, depending on configuration
- Multiple modules can be combined simultaneously
- Status in HolestPay format: Modules can add status as
<module-uid>_FISCAL:<status> or <module-uid>_INTEGR:<status>. Important: Some modules don't add any status to HolestPay format
Types of Fiscal & Integration Modules:
1. Electronic Invoicing and Fiscalization
Modules for integration with tax systems of different countries. Automatic creation and sending of fiscal receipts, invoices, and other documents according to local regulations.
2. Order Export (FTP/SFTP/API)
Modules for automatic order export to external systems:
- Export in various formats (XML, JSON, CSV, custom)
- Configurable triggers (payment status, shipping, etc.)
- Useful for integration with warehouse, ERP, and book-keeping systems
3. Book-keeping Software Integrations
Modules for two-way integration with accounting software:
- Automatic order synchronization
- Product, inventory, and price synchronization
- Report generation
4. Data Feed Modules
Enable order data availability through various feed formats.
5. Notification Modules
Specialized modules for sending notifications (push, SMS, email) in specific scenarios.
6. Custom Integrations
HolestPay supports development of custom fiscal & integration modules for your specific business needs via API.
Note: The list of available fiscal & integration modules is constantly expanding. For currently available modules and their capabilities, check the "FISCAL/INTEGRATION MODULES" section in HolestPay panel or contact support.
7. Backend Order Operations
HolestPay enables management of all order aspects in two ways:
- Directly on your site - via ready-made modules (WooCommerce, Magento, OpenCart, VirtueMart, Shopify...)
- In HolestPay panel - central management of all POSes
Advantage of Ready-Made Modules - Everything in One Place:
- No need to use multiple panels - all HolestPay operations are integrated directly into your platform's admin panel
- Same functionality - modules add identical commands that exist in HolestPay panel
- Identical process - operations execute the same procedures, whether initiated from your site or HolestPay panel
- Concentrated management - all order aspects (payment, fiscal, shipping operations) are available in one place
HolestPay Integration on Your Site
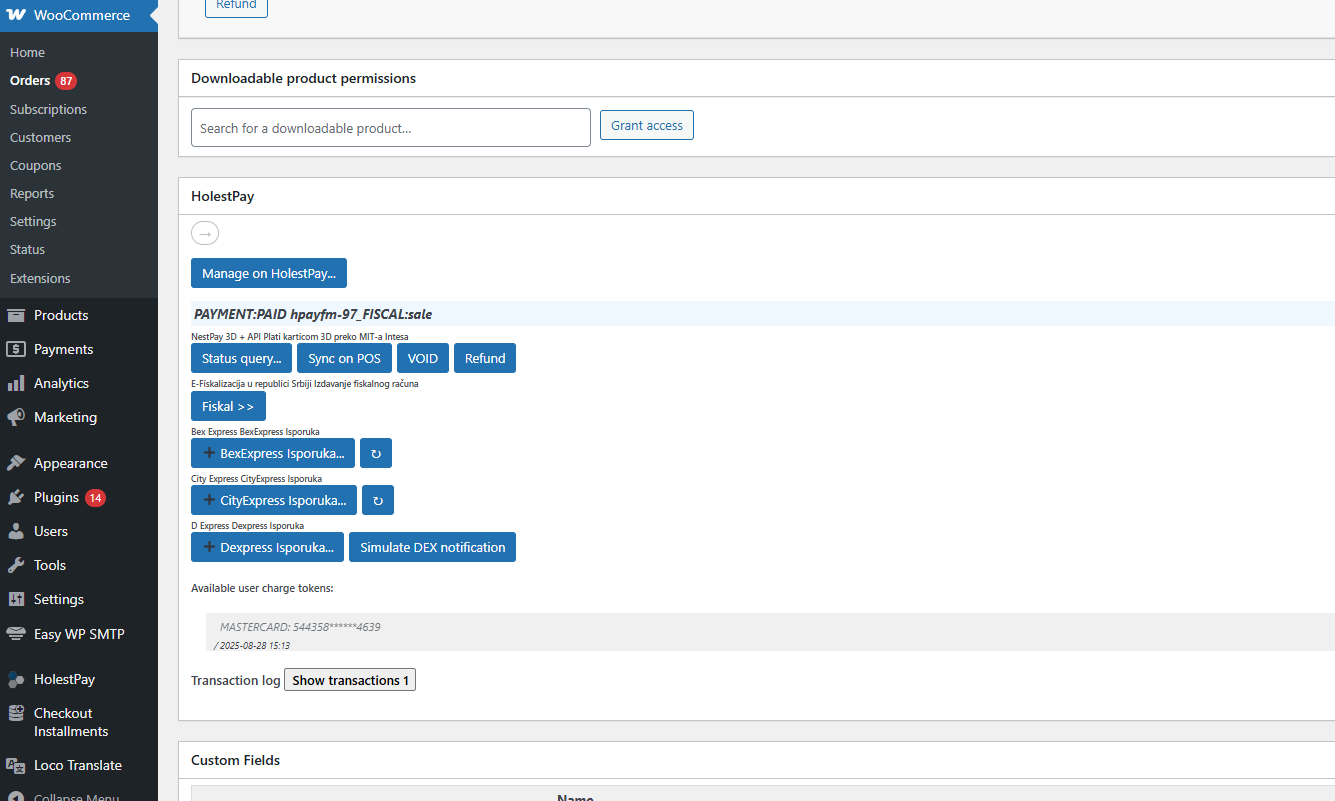
Figure 11: HolestPay section in order details on site (WooCommerce example) - all operations available directly in your admin panel
When using a ready-made module (WooCommerce, Magento, OpenCart, VirtueMart, Shopify...), in each order's details you see HolestPay box displaying:
- HolestPay status - full status in HolestPay format (PAYMENT, FISCAL, SHIPPING)
- Payment operations - buttons for Status Query, Sync on POS, VOID, Refund, Capture, etc.
- Fiscal operations - issuing fiscal receipt, recall, refund, etc.
- Shipping operations - creating shipment, printing label, tracking status for each courier
- "Manage on HolestPay..." button - quick switch to HolestPay panel
Important: ALL operations possible for a given order will be available in HolestPay box on your site, identical to how they're available in HolestPay panel. There's no difference in functionality - you get full control directly from your platform's admin panel.
Management via HolestPay Panel
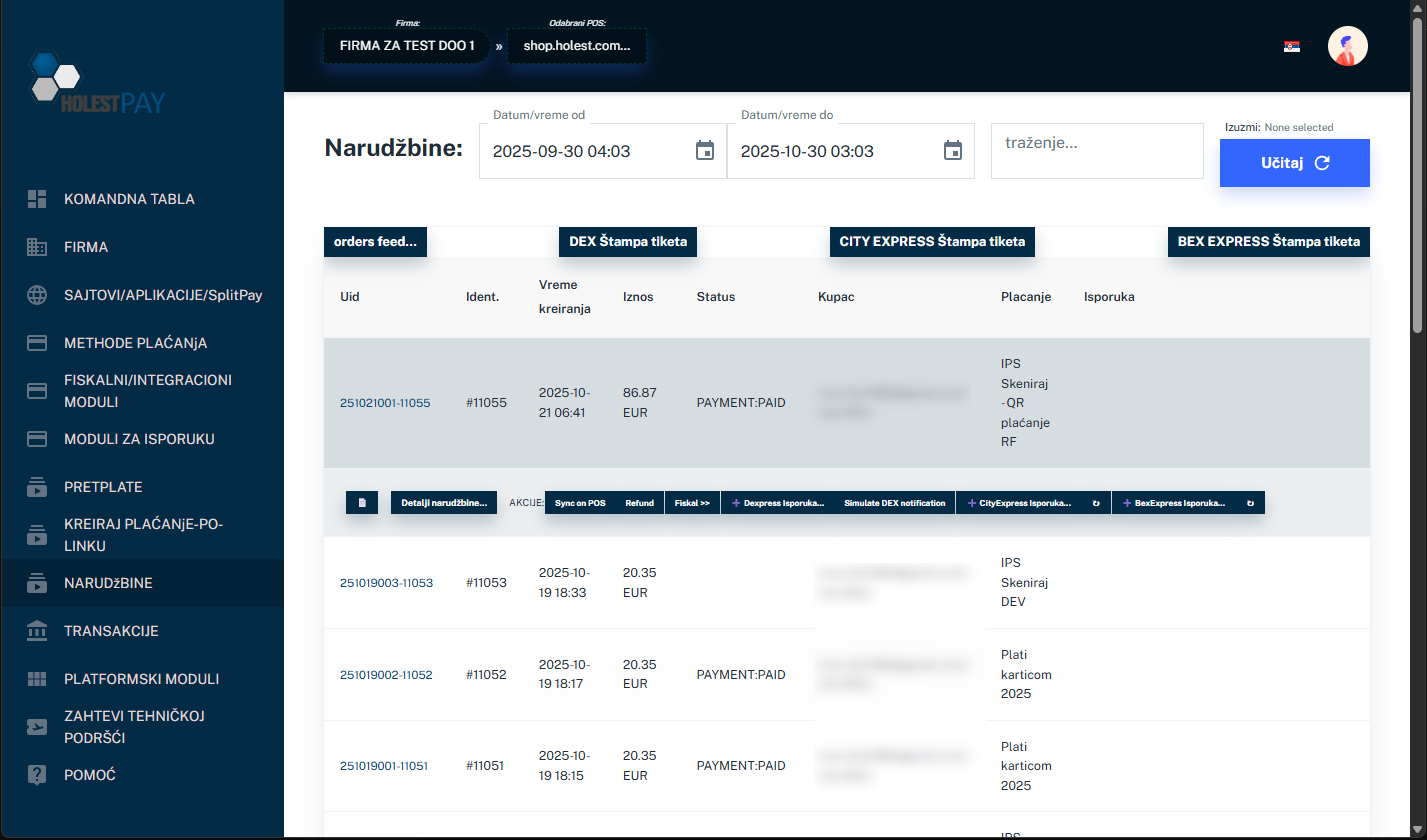
Figure 12: Order list in HolestPay panel with statuses and available options
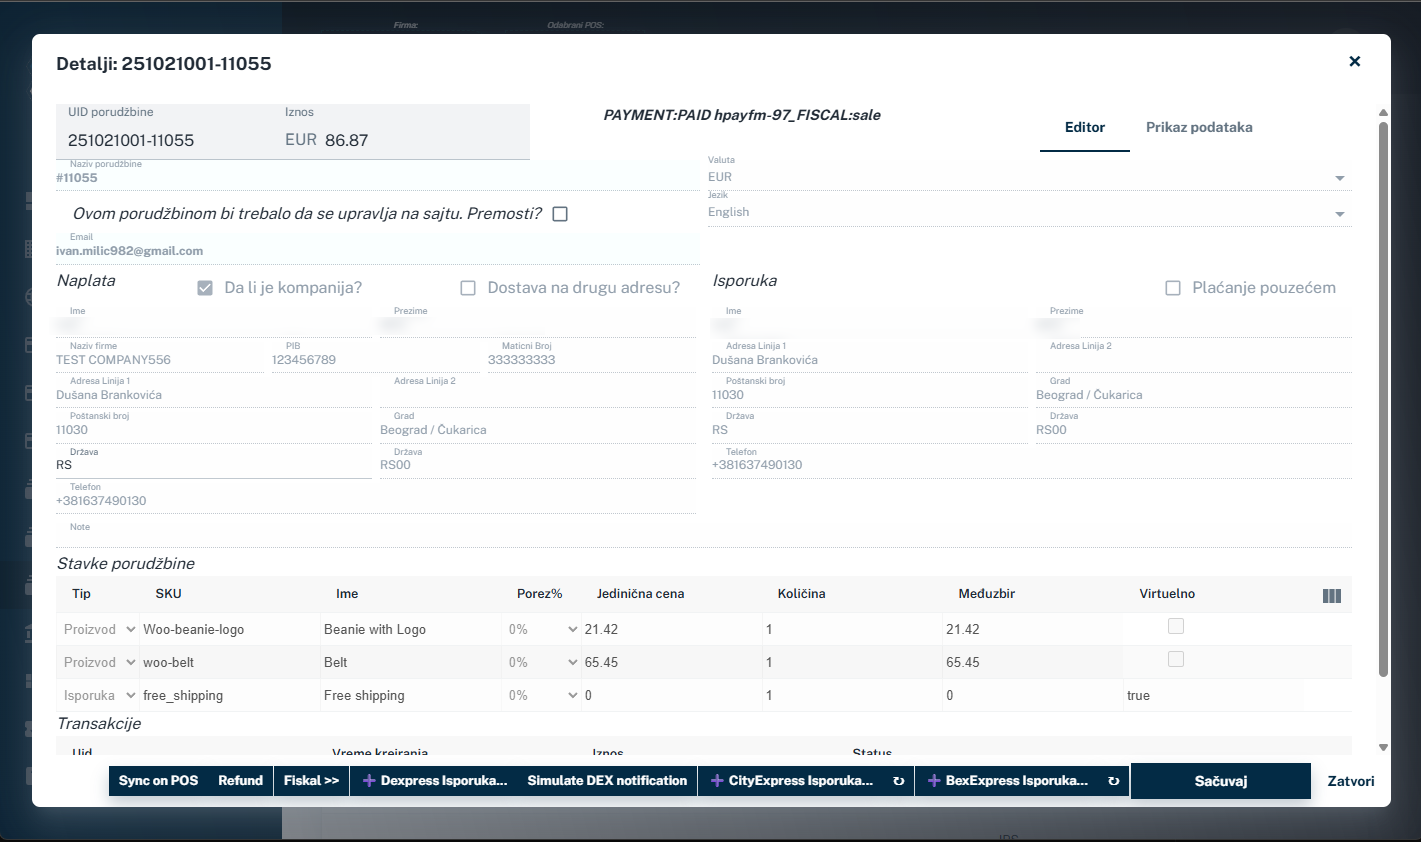
Figure 13: Order details in HolestPay panel with available operations
HolestPay panel enables central order management from all your POSes (sites/applications). Useful for:
- Viewing all orders from multiple POSes in one place
- Advanced options not available in basic modules
- System administration, configuring payment, shipping, fiscalization methods
- Detailed reports and analytics
Note: Set of available operations depends on current order status and system configuration. System dynamically displays only operations that are valid at given moment.
7.1. Payment Operations
Status Query
Function: Re-checks transaction status directly with payment gateway.
When to use:
- If you suspect status is not synchronized
- After technical communication problems
- If customer claims payment was made but system doesn't show payment
Capture (Post-Authorization)
Function: Executes charging after pre-authorization.
Note:
- Amount can be less than or equal to reserved amount
- Must be executed before reservation expires (usually 7 days)
- Some payment gateways support multiple capture operations
VOID (Cancellation)
Function: Cancels transaction before bank executes clearance.
When available:
- For pre-authorization - anytime before reservation expires
- For authorization - only within first few hours
Advantage: Usually no commission (unlike refund)
Note: IPS method does NOT support VOID operation. For money return from IPS, use only REFUND.
REFUND (Money Return)
Function: Returns money to customer after transaction is executed and clearance completed.
Characteristics:
- Can be full or partial refund (if method supports)
- Usually has commission
- Process takes 3-10 days
- Some card methods don't support partial refund
Note: After executing refund, corresponding fiscal document (refund or recall) needs to be created.
Warning for Installment Payments: Payments made in installments cannot be refunded programmatically. You must contact bank directly for refunding such payments.
Send Payment Link - PAY-BY-LINK
Function: Creates and sends link to customer for completing payment off your site (offsite option).
Useful for:
- Failed payments that customer wants to retry
- Manual order creation (by phone, email)
- Sending payment via other communication (Email, SMS, WhatsApp, Viber, etc.)
- Orders created off-site requiring online payment
- Top-ups/additional charges for existing orders
How it works:
- In HolestPay panel (or via API) you create payment link
- Enter amount, description, customer data
- System generates unique link
- Send link to customer via any channel
- Customer clicks and opens payment page (hosted by HolestPay)
- Customer completes payment
- You receive notification about result
Note: This is offsite option - customer doesn't buy on your site but directly on HolestPay payment page. This is exception from standard flow where customers buy on your site.
7.2. Shipping Operations
Create Shipment
Function: Creates shipment and gets tracking number from courier service.
Required data:
- Number of packages
- Weight
- Dimensions (optional)
- Contents (optional)
- Shipment value
- Notes for courier
Print Label
Function: Generates and prints package label.
Label contains:
- Barcode / QR code for tracking
- Recipient address
- Sender address
- Tracking number
- Delivery instructions
Submit to Courier
Function: Sends request to courier service to pick up package.
Status changes from: READY → SUBMITTED
Cancel Shipment
Function: Cancels shipment before or after sending to courier.
Note: Possible cancellation depends on courier service policy and current shipment status.
7.3. Fiscal Operations
Issue Fiscal Receipt
Function: Issues fiscal receipt for sale.
When: After payment is successfully completed.
Parameters: No additional parameters
Fiscal Refund
Function: Issues fiscal receipt for goods return.
Required parameters:
- Customer TIN (prefix:value, e.g., 10:105677555)
- Refund amount (can be partial)
Note: Automatically links to original sale receipt.
Fiscal Recall
Function: Cancels previously issued receipt.
When to use:
- Error in receipt issuance
- Money refund when customer refuses to provide personal data
Parameters: No additional parameters - TIN not required
Fiscal Advance
Function: Issues advance receipt for partial payment.
Required parameters:
- Customer TIN
- Advance amount
Fiscal Proforma
Function: Issues proforma that doesn't affect taxes.
Required parameters:
Send Fiscal by Email
Function: Re-sends fiscal receipt to customer via email.
Useful when:
- Customer didn't receive email
- Customer lost receipt
- Need to send to different email address
Sync on POS
Function: Re-sends results to your site/application
When to use: When you want to manually refresh data on your POS
8. Purchase Process (Customer Flow)
Important - Where Purchase Takes Place:
- Customers buy on your site/application (merchant), not on HolestPay platform
- HolestPay is only used for payment processing in the background
- Exception: Pay-by-Link (Offsite) option - where you can send payment link to customer off your site (details in section 9. Pay-by-Link)
Standard Payment Flow (same for all methods):
- Payment initiation - Customer selects products on your site and chooses payment method on checkout page
- Input form presentation - System displays form for entering data specific to selected method (card details, QR code, payment slip, etc.)
- Result processing - Payment gateway processes transaction and returns result
- Calling fiscal and shipping methods - After successful payment, configured fiscal and shipping methods are automatically called
- Result display - Customer sees transaction result (success/failure), payment details, fiscal receipt, and shipping information
Important: Although basic flow is same for all payment methods, input form presentation and user experience differ:
- Card payments - form for entering card data, 3D Secure authentication
- IPS payments - QR code or phone number entry
- Payment slips - generation and display of payment slip with QR code
- Installments - eligibility check and special approval flow
Manual Method Invocation
Note: All payment, fiscal & integration, and shipping methods can be invoked
manually:
- Payment methods - you can send payment link, retry payment, execute refund manually
- Fiscal & integration methods - you can manually issue fiscal receipt, recall, refund, execute export, etc.
- Shipping methods - you can manually create shipment, print label, change status, etc.
Manual invocation is done from HolestPay panel or via API.
9. Pay-by-Link - Payment via Link
Pay-by-Link is a feature that allows you to create a unique payment link that you can send to your customer. There are two versions:
9.1. Offsite Pay-by-Link (HolestPay Panel)
Creating link directly in HolestPay panel - customer pays on HolestPay hosted page.
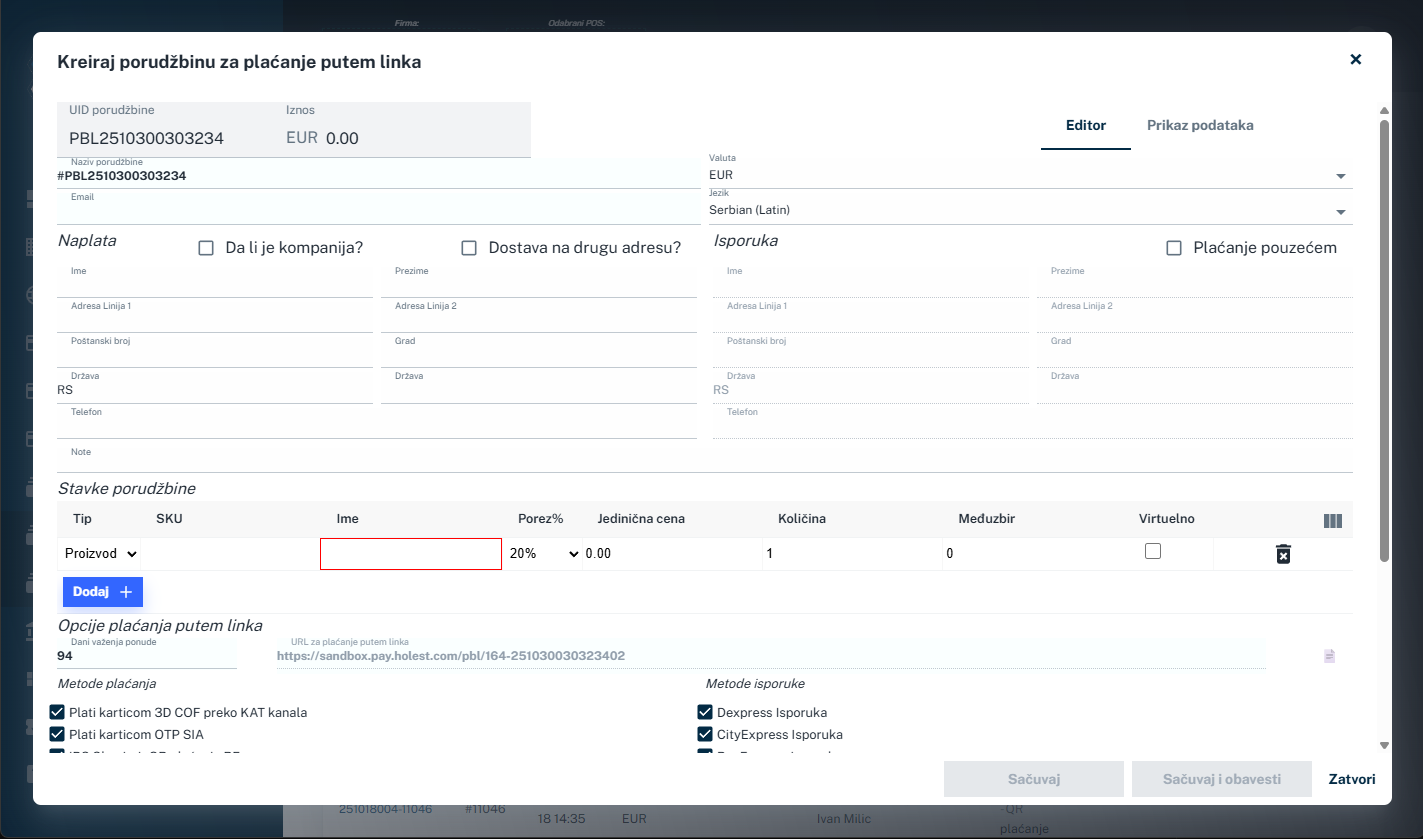
Figure 12: Pay-by-Link creation form in HolestPay panel
How to create:
- In HolestPay panel, open Order or Transaction section
- Click on "Create Pay-by-Link" or similar option
- Enter order details:
- Payment amount
- Order description / products
- Customer data (name, email, phone, address)
- Order items (optional)
- Select available payment methods that customer can use
- If shipping is required, select available shipping methods that customer can choose
- Set offer validity period (link will be active until specific date/time)
- Choose notification sending option (optional):
- Email notification - included in the system
- SMS notification - charged according to current price list
- Click on one of two buttons:
- "Save" - only creates link, without sending notifications
- "Save and Notify" - creates link and automatically sends Email (and SMS if selected) to customer
- System creates unique link that you can copy and send to customer (if you didn't use "Save and Notify")
Note - Personalization:
- Page styling: Pay-by-Link page can be styled through the "Form Input Style" section in POS settings - you can customize colors, fonts and form appearance
- Email template: Email notification content can be modified in the "Mail Templates" section of POS settings - full customization of text, design and branding
- SMS pricing: SMS notifications are charged according to current price list, while Email notifications are included in the system
When customer opens the link:
- Sees HolestPay hosted page with order details
- Chooses desired payment method from offered options
- If shipping exists, selects shipping method
- Enters required payment data
- Completes payment
When to use offsite Pay-by-Link:
- Orders received by phone, email, or social media
- Customer doesn't have access to your site at the moment
- Sending offer with validity period
- Top-up/additional charge for existing order
- Sending invoices for services
- Any situation where you want to quickly create payment link without customer visiting your site
9.2. On-site Pay-by-Link (WooCommerce and Other Modules)
Some platform modules (like WooCommerce) have on-site Pay-by-Link option that works similarly, but with an important difference:
The difference:
- Offsite (HolestPay panel): Customer pays on HolestPay hosted page - you need to manually enter all details in panel
- On-site (WooCommerce): Link leads customer to standard checkout of your platform (your site) - uses existing WooCommerce order
How on-site Pay-by-Link works:
- Order already exists in your WooCommerce system
- In HolestPay box in order details, click "Send Payment Link"
- Link leads customer directly to checkout page of your site for that order
- Customer completes payment through your standard checkout process
Advantages of on-site version:
- Customer stays on your branded site
- You don't need to manually enter order details - order already exists in system
- Uses all your existing WooCommerce settings and design
- Better branding and user experience
Advantages of offsite version:
- Faster creation - directly from HolestPay panel without need to create order on site
- Works even when you don't have platform module installed
- Can be used for services not related to e-commerce platform
- Ideal for phone orders and quick offers
Important - Choosing version:
- If you have WooCommerce (or other platform with module) and order already exists - use on-site version
- If you don't have installed module or want to quickly create offer - use offsite version from HolestPay panel
- Both versions support all payment methods, validity period and all HolestPay features
Order Tracking
Order tracking method depends on implementation on your site/application. Usually includes:
- Email notifications
- Status tracking page
- Customer support
10. Help and Documentation
HolestPay system contains built-in help section with useful guides and examples.
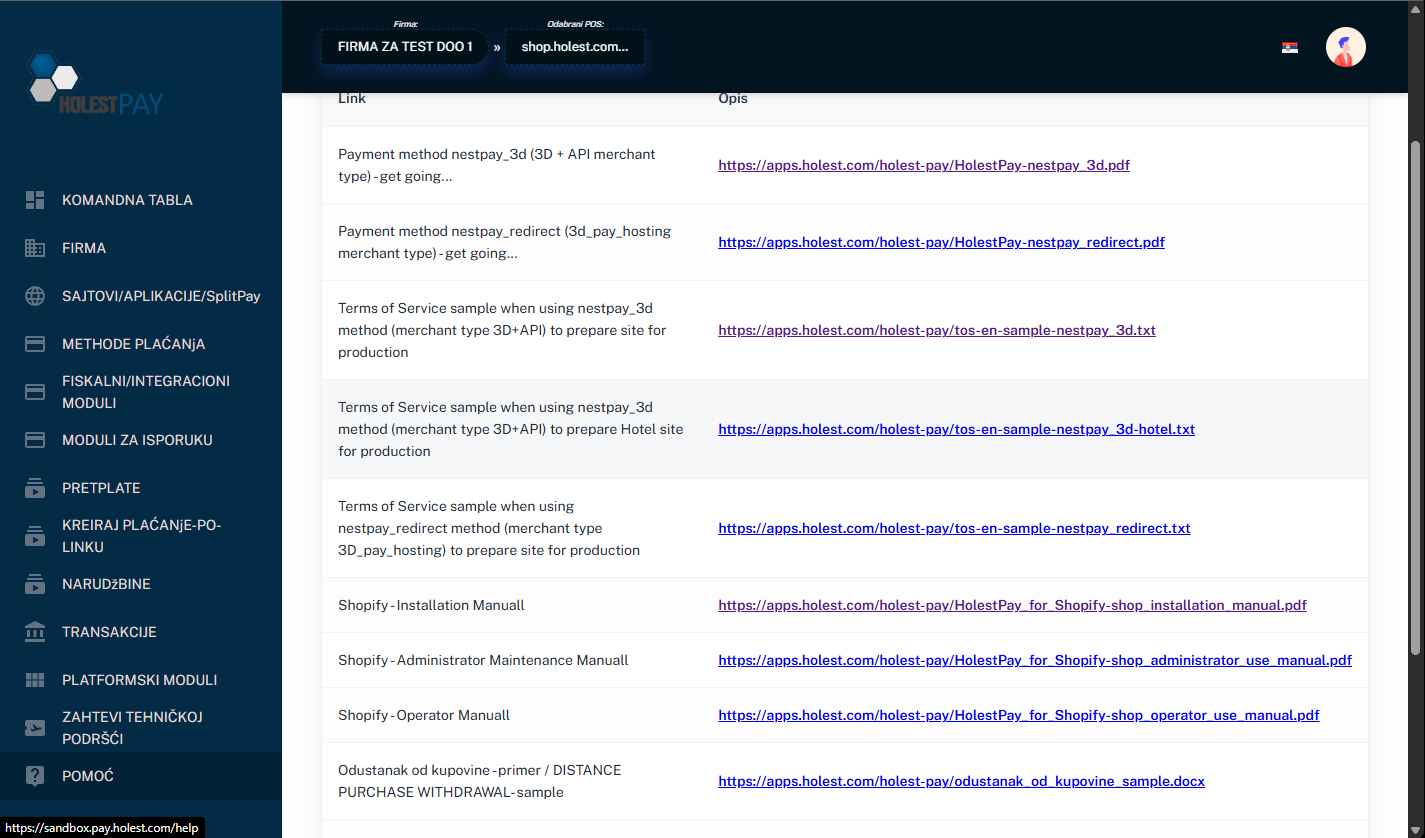
Figure 14: Help section with documents and guides
Types of Available Documentation:
- Payment method guides - For configured payment methods and gateways
- Shipping method guides - For configured shipping methods
- Fiscal & Integration guides - For fiscal and integration modules
- Platform modules - Guides for installing and using modules for different platforms
- API documentation - For custom integrations and development
- Terms of Service samples - Examples of contracts and legal documents
- Practical examples - Code examples and best practice implementations
Note: Available documentation depends on configured modules and methods on your POS. Documentation is regularly updated and expanded.
How to Access Documentation:
- In HolestPay panel left menu, click on "HELP" (or question mark icon)
- Select documentation category that interests you
- Click on document link you want to view
- Document will open in new tab or download
HolestPay can be integrated with your platform in multiple ways:

Figure 15: Example of available platform modules list
Integration Types:
1. Ready-Made Platform Modules (plugin/extension)
HolestPay offers ready-made modules for popular e-commerce and CMS platforms. List of available modules is constantly expanding.
Ready-Made Module Characteristics:
- Full-featured modules - Complete integration that adds HolestPay operations directly into your platform's admin panel. Commands execute identical procedures as in HolestPay panel.
- Mini variants - Lighter version that adds basic functionality and links to HolestPay panel.
- Status columns - Some modules add column with HolestPay status in order list.
Note: For currently available platforms and their modules, check "PLATFORM MODULES" section in HolestPay panel or on website. List is regularly updated.
2. JavaScript/HTML Integration
For custom platforms or direct web integration:
- HTML with embedded credentials - Page with embedded POS credentials, starting point for integration
- HPay-FrontCore - JavaScript library with automatic signing
- Custom JavaScript implementation - Using HolestPay JavaScript SDK
3. API Integration
For full control and custom integration:
- RESTful API - Complete functionality available via API
- Webhook support - Real-time notifications about status changes
- Detailed documentation - API reference with examples
- Libraries for different languages - PHP, Python, Node.js, etc.
Example - HolestPayPHP library:
PHP 7.2+, 8.*, 9.*
Required PHP module: php-curl
How to Choose Integration Method:
| Scenario |
Recommended Integration |
| Using popular e-commerce platform |
Check if ready-made module exists |
| Custom web application |
JavaScript/HTML integration or API |
| Mobile application (Android/iOS) |
API integration |
| Desktop application |
API integration |
| Full control needed |
API integration |
Recommendations:
- If ready-made module exists for your platform, use it - they're tested and maintained
- For custom solutions, consult with HolestPay technical support
- Always test first in sandbox environment
12. Email Template Editing
HolestPay enables full personalization of email messages that the system sends to customers. These settings are located in the POS settings section.

Figure X: List of available email templates for customization
12.1. Available Templates
In the email templates section, you can see all available templates that you can customize. Each template serves a specific purpose in the payment and order process.
12.2. Template Editing Process
Email template editing is done in three steps:
Step 1: Select Template
- In HolestPay panel, go to POS settings
- Find the "Mail Templates" section
- Select the template you want to edit from the list
Step 2: Select Test Data
Before you start editing, you need to select test data:
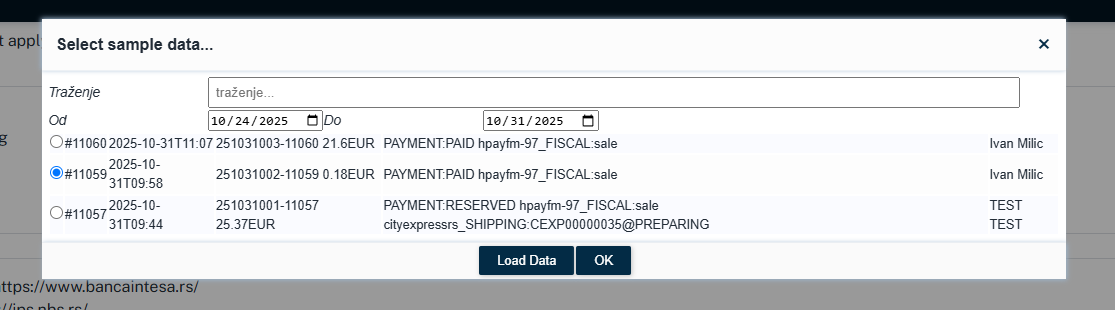
Figure X+1: Select existing order or order list for test data
- If template applies to one order - select existing order from the list
- If template applies to multiple orders - select order list
- Test data enables you to see how the email will look with real data while editing
Step 3: Editing in Editor

Figure X+2: Editor for editing email templates with live preview functionality
The editor is divided into three panels with live preview functionality:
Left side of editor:
- Top-left: Liquid code - Here you write and edit Liquid template code with HTML and CSS styles
- Bottom-left: Test data - JSON data from selected order or order list that you can review and use in the template
Right side of editor - Preview panel:
- Tab "HTML view" - Shows how the email will actually look to the customer (rendered HTML with styles)
- Tab "Raw output" - Shows clean HTML code that will be generated (useful for debugging)
Live preview functionality:
- Every change in Liquid code (top-left) automatically updates preview (right) in real-time
- Every change in test data (bottom-left) also immediately updates preview
- You don't need to click "refresh" or "preview" - everything happens automatically as you type
- You can instantly see how the email will look with real data
Additional features:
- Liquid template language - Safe to use (one-way rendering without code execution)
- Available variables - List of all variables you can use in template (e.g. customer name, order amount, order number, etc.)
- HTML and CSS - Full customization of design, colors, fonts and styling
- Branding - Add your logo, company colors and complete personalization
12.3. Liquid Template Language
Liquid is a template language used for secure customization of email messages:
- Safe - One-way rendering without ability to execute arbitrary code
- Simple - Intuitive syntax for displaying variables and conditions
- Powerful - Supports filters, loops, conditions and other programming constructs
Liquid Syntax Examples:
{{ customer.name }}
{{ order.total | money }}
{% if order.shipping_address %}
Shipping address: {{ order.shipping_address }}
{% endif %}
IMPORTANT - First Line of Liquid Output:
The first line of Liquid render output is used as the email subject (Subject). This is very important for proper email template operation.
Example:
Your order #{{ order.number }} has been confirmed
<!-- This first line becomes the email Subject -->
<html>
<body>
<h1>Thank you for your order!</h1>
<p>Your order number {{ order.number }} has been successfully received.</p>
</body>
</html>
In this example, the email Subject will be: "Your order #12345 has been confirmed", while the rest will be the email body.
12.4. Saving Changes
After you finish editing the template:
- Review how it looks in preview with test data
- Test with different test data if needed
- Verify that the first line is properly formatted for the email Subject
- Click "Save" to apply changes
- New template will be immediately used for all future emails of that type
Important - Styling and Testing:
- Email templates can be combined with "Form Input Style" POS settings for consistent branding
- It is recommended to test emails on different email clients (Gmail, Outlook, etc.)
- Use inline CSS styles for best compatibility with email clients
- Keep backup of old templates before replacing them
- Always test changes with real data before putting them in production
13. Support and Contact
Technical Support
For all questions, problems, or help related to HolestPay system:
- Email: support@holest.com
- Web: https://pay.holest.com/ or https://sandbox.pay.holest.com/
- Product info: https://ecommerce.holest.com/proizvod/holestpay/
Support Availability
Technical support is available on business days:
- Monday - Friday: 09:00 - 17:00 (CET)
How to Request Help
When contacting support, prepare the following information:
- Problem description - as detailed as possible
- When problem occurred - date and time
- Order ID or transaction ID - if related to specific transaction
- Screenshots - if possible
- Steps to reproduce - how to replicate problem
- Company and POS name - so we can quickly locate your account
Documentation and Resources
Additional documentation, API reference, and video tutorials available at:
- On HolestPay panel - "HELP" section
- By contacting support for developer documentation access
- On website: https://ecommerce.holest.com/proizvod/holestpay/
Sandbox Environment for Testing
Before production implementation, we recommend testing in sandbox environment:
- Sandbox URL: https://sandbox.pay.holest.com/
- Completely free
- All features unlocked
- Uses test payment gateways
- Test cards available in "Dashboard" section
Subscriptions and Pricing
For information about subscriptions, pricing, and available packages:
- Contact sales@holest.com
- Or check at https://ecommerce.holest.com/proizvod/holestpay/
Important for Integrators: If you're an integrator working with multiple clients, you can use one account to manage all companies. Each company is created separately, and you can be administrator or owner for multiple companies simultaneously.
System Status
To check HolestPay service status in real-time:
- Check status page (URL will be provided by support)
- Or subscribe for incident notifications
Security Incidents
If you suspect a security incident or discover a vulnerability:
- Immediately contact: support@holest.com
- Don't share details publicly before problem is resolved
Feature Requests and Feedback
Your feedback is important! If you have suggestions for new features:
- Send email to office@holest.com
- Or use feedback option in panel